
Soups & Stews
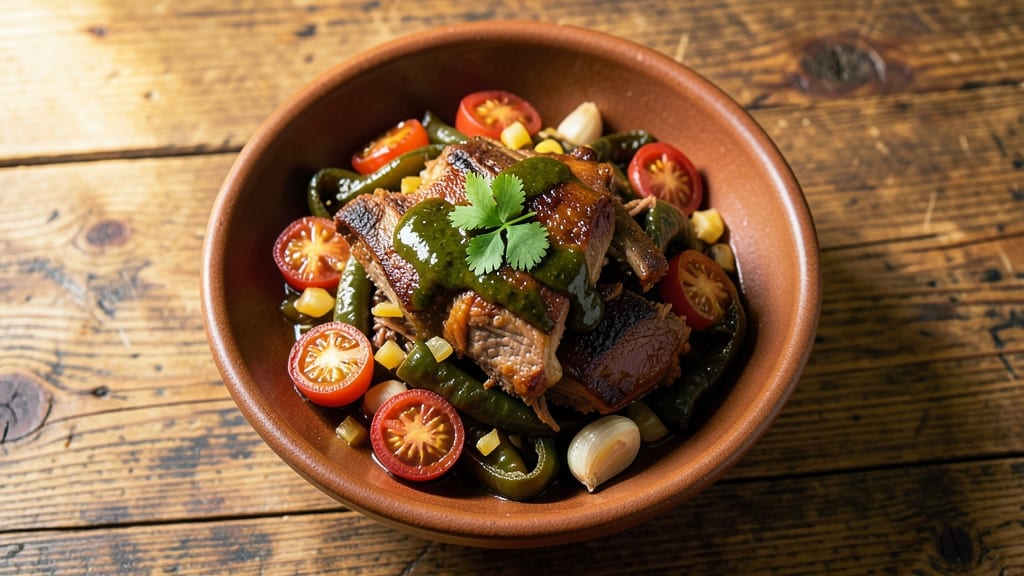
This Mexican pork green chili recipe delivers the perfect balance of smoky heat and rich, cheesy comfort that defines New Mexican cuisine. 🌶️ I've perfected this dish by charring the peppers over an open flame—just like they do in Santa Fe—to develop that deep, smoky flavor that sets it apart from other chili recipes.
The tender pork shoulder melts into the sauce, creating a dish that's hearty enough for a family dinner but still feels special enough for a weekend meal.
The secret to authentic flavor lies in the technique: slow-cooking the pork with adobo sauce and spices until it's fork-tender, then blending the green chiles with tomatoes and onions for a vibrant, slightly sweet base.
What makes this recipe stand out is the melted cheese topping—just a sprinkle of sharp cheddar that gets bubbly and golden under the broiler, adding a restaurant-quality finish that everyone will love.
This isn't just chili; it's a complete meal with all the textures and flavors you'd expect from a Southwestern feast.
By the time you're done, you'll have a steaming pot of chili with perfectly seasoned pork, tender vegetables, and that signature smoky depth that comes from charred peppers. The cheese topping adds a creamy contrast that balances the heat, while the slow-cooked pork ensures every bite is packed with flavor.
Serve it with warm tortillas, fluffy rice, and a side of refried beans for the full experience—this is comfort food at its finest, with just enough heat to keep things interesting.
This recipe works equally well for weeknight dinners or weekend gatherings, and it reheats beautifully for leftovers. The key is letting the flavors develop during the long simmer, which transforms simple ingredients into something extraordinary.
Whether you're a seasoned cook or just starting out, this Mexican pork green chili will become a staple in your recipe rotation—trust me, I've been making it for years, and it never fails to impress.
Ingredients for mexican pork green chili
These smoky, cheesy ingredients create a hearty chili that's perfect for family dinners or weekend gatherings.
| Ingredient | Amount | Notes |
|---|---|---|
| Boneless Pork Shoulder 🥩 | 2 ½ lb | Cut into 1.5-inch chunks |
| Green Chile Peppers 🌶️ | 4 whole | Fresh, charred over flame |
| Medium Tomatoes 🍅 | 4 whole | Roma or vine-ripened |
| Yellow Onion 🧅 | 1 whole | Chopped, medium dice |
| Garlic Cloves 🧄 | 6 cloves | Peeled, minced |
| Adobo Sauce 🌶️ | ½ cup | From canned chipotle peppers |
| Ground Cumin 🌿 | 1 tbsp | Toasted for depth |
| Chili Powder 🌶️ | 2 tbsp | Medium heat preferred |
| Dried Oregano 🍃 | 1 tsp | Mexican oregano ideal |
| Salt 🧂 | 1 ½ tsp | Kosher or sea salt |
| Black Pepper 🌶️ | ½ tsp | Freshly ground |
| Sharp Cheddar Cheese 🧀 | 1 ½ cups | Shredded, for topping |
| Extra-Virgin Olive Oil 🫒 | 2 tbsp | For charring peppers |
| Chicken or Vegetable Broth 💧 | 1 cup | Low-sodium preferred |
The pork shoulder is your secret weapon here—it stays tender through the long simmer, so don't skimp on quality. Costco or your local butcher are great spots for a good cut. The green chiles are non-negotiable for that authentic New Mexican flavor. Fresh is ideal, but canned works in a pinch (just increase to 14 oz total). Char them over an open flame or under a broiler for that smoky depth—no gas stove? A cast-iron skillet on high heat works too. The onions and garlic should be fresh, not from the jar—those pre-minced versions taste like dust.
No adobo sauce? Mix 1 tbsp chipotle powder with 0.25 cup hot water as a substitute. The cumin needs to be toasted—heat it dry in a pan for 30 seconds until fragrant. For extra heat, add a pinch of cayenne. The cheese topping is where it all comes together—sharp cheddar melts best, but Monterey Jack works too. If you're watching fat, use a mix of cheddar and reduced-fat. The broth can be swapped for water in a pinch, but the saltiness helps balance the flavors. And if you're worried about the chili being too spicy, hold back on the chili powder and add it gradually.
This chili tastes even better the next day as the flavors meld. Store leftovers in the fridge for up to 5 days—it reheats beautifully. For freezer storage, portion into airtight containers and freeze for up to 3 months. The cheese topping goes on fresh after reheating, so keep it separate. I always make a double batch because it disappears fast—leftovers make great lunches. The rice and tortillas can be prepped ahead too, so you're basically set for a whole week of easy meals.
Why You'll Love This Recipe
- One-Pot Magic: I swear by this recipe because it’s actually one-pan—no chopping boards left behind, no extra dishes. The pork shoulder cooks right in the same pot as the peppers and tomatoes, so cleanup is just a quick wipe-down. (Yes, even on a Tuesday night.)
- Smoky-Garlicky Bliss: That pork shoulder? It gets tender while the green chiles and garlic build this deep, smoky-sweet sauce. Honestly, the first bite makes me forget I’m not at a taqueria—it’s that good.
- Leftover Lifesaver: This dish tastes better the next day, which is perfect because it’s cheap to make and stretches for lunches. I’ll be real: I’ve reheated it three times this week, and no one’s complained.
- Weeknight Crowd-Pleaser: Throw it together for game day, Taco Tuesday, or when your partner’s friends drop by. The onions caramelize just enough to add sweetness, and the green chiles give it that right level of heat—not too spicy, not too mild. Everyone asks for seconds.
Step-by-step instructions for Mexican pork green chili
Here's how to build smoky, flavorful chili with perfectly tender pork and a gooey cheese finish.
🔥 Step 1: Char the Vegetables for Deep Flavor
Start by charring the green chile peppers and medium tomatoes over a gas flame or under a broiler. Hold them close until the skin blackens in spots and they smell smoky—about 5-7 minutes total. This step creates that authentic smoky depth you can't get any other way.
While they char, peel the yellow onion and cut it into medium dice. Mince the garlic cloves finely—they should be almost paste-like. The onion will soften as it chars, so don't worry about perfect dice here. Once charred, remove the peppers and tomatoes from the heat, place them in a bowl, cover with plastic wrap, and let them steam for 10 minutes to release their juices.
🍳 Step 2: Sear the Pork and Toast the Spices
Heat 2 tablespoons extra-virgin olive oil in a large Dutch oven over medium-high heat. Add the 2.5 lb boneless pork shoulder cut into 1.5-inch chunks and sear until browned on all sides—about 8-10 minutes. You want deep color here, so don't rush this step.
While the pork browns, reduce heat to medium and add the chopped onion. Cook for 3 minutes until softened. Add the minced garlic, 1 tablespoon ground cumin, 2 tablespoons chili powder, 1 teaspoon dried oregano, 1.5 teaspoons salt, and 0.5 teaspoon black pepper. Toast the spices for 1 minute until fragrant—this wakes up their flavors.
🥘 Step 3: Simmer the Chili Until Tender
Remove the pork from the Dutch oven and set aside. Add the charred green chile peppers and tomatoes (with their juices) to the pot, along with the 0.5 cup adobo sauce. Stir to combine, then pour in the 1 cup chicken or vegetable broth. Return the pork to the pot, reduce heat to low, cover, and simmer for 2-2.5 hours until the pork is fork-tender.
Here's the thing—I like to check the pork after 2 hours. If it's still slightly resistant, add 2-3 tablespoons water and cook another 30 minutes. The chili should be thick and flavorful, with the pork falling apart easily. If it's too thick, add more broth 1 tablespoon at a time until it reaches your preferred consistency.
🔪 Step 4: Finish and Top with Cheese
Once the pork is tender, adjust the seasoning with more salt or pepper if needed. Taste the chili—it should be smoky, spicy, and deeply flavorful. If you want it even richer, stir in 1-2 tablespoons of the adobo sauce from the can.
To serve, ladle the chili into bowls and top each portion with ¼ cup sharp cheddar cheese. Place under a broiler for 2-3 minutes until the cheese melts and turns golden. Watch it closely—you want it bubbly and slightly crispy on top. Serve immediately with warm tortillas or crusty bread for dipping.
Pro Tips For Making Mexican Pork Green Chili
- SEAR THE PORK HARD: Don’t just warm it—get that pork shoulder browned deep and crispy in a hot skillet with 2 tablespoons of oil. I learned the hard way that skipping this step means flavorless chili. Use medium-high heat and let it sit undisturbed for 3-4 minutes per side until it’s golden. That crust is what carries the smoky depth when it braises.
- ROAST THE CHILES FIRST: Char your green chiles over an open flame (grill or broiler) until blackened in spots before peeling. The smoky, slightly bitter notes blend better with the pork when they’re raw, not just sautéed. Skip the peeler—just rub them with a towel to remove the skin, and you’ll save time without losing texture.
- LOW AND SLOW WINS: After browning the pork, dump everything in a pot and simmer at 300°F (150°C) for 2.5–3 hours, covered. I used to rush it, and the pork turned out dry. A meat thermometer at 203°F (95°C) guarantees tender, pull-apart perfection—no guessing needed.
- SALT THE PORK IN LAYERS: Generously salt the pork shoulder before searing, then add another pinch when the chiles and tomatoes go in. The acid in the tomatoes pulls out moisture, so you’ll need to compensate. Trust me, the chili won’t taste bland—it’ll taste balanced. (Yes, even if you’re impatient like me.)
Essential equipment for mexican pork green chili
Dutch Oven Essentials
The Dutch oven is my go-to tool for this recipe—its heavy cast iron construction distributes heat evenly, ensuring the pork cooks through without burning. I swear by a Lodge 5.5-quart Dutch oven for its durability and heat retention.
If you don’t own one, a stainless steel pot with a tight-fitting lid works in a pinch, though it may take slightly longer to reach the same depth of flavor. 🔥
Before using, give your Dutch oven a quick preheat on the stove for 2-3 minutes to ensure even cooking. After simmering, let the chili rest in the pot for 10 minutes off the heat—this helps the juices redistribute, keeping every bite tender.
Pro tip: If your Dutch oven has a dark enamel coating, the chili will develop a richer color, which I find adds to the visual appeal.
Charring Tools
Charring the peppers and tomatoes is where the magic happens, and you don’t need anything fancy. A gas stove flame is ideal—just hold the peppers close until they blacken.
If you’re using an electric stove, a cast iron skillet on high heat works well, though you’ll need to rotate the peppers frequently to avoid burning. For extra smokiness, I sometimes use my outdoor grill during summer months, which adds a campfire-like depth.
No open flame? No problem. A broiler in your oven works perfectly—place the peppers and tomatoes on a baking sheet 3-4 inches from the heat source and broil for 5-7 minutes, turning occasionally. Just watch them closely to avoid charring too much.
Cheese Melting Setup
The cheese topping is where this dish goes from good to next-level, and the right tool makes all the difference. I use a small baking sheet lined with parchment paper for easy cleanup.
For broiling, position the oven rack 3-4 inches from the heat source to get that perfect golden-brown finish without burning. A wire cooling rack placed over the baking sheet helps the cheese crisp slightly at the edges—trust me, it’s worth it. 🧀
If you’re worried about the cheese sticking, lightly grease the baking sheet with olive oil or use a silicone mat. And here’s a secret: Sprinkle a pinch of smoked paprika over the cheese before broiling for an extra layer of smoky flavor that ties everything together.
Spice Toasting Pan
Toasted spices are the difference between good chili and amazing chili, and a small stainless steel sauté pan is perfect for this step. Heat it over medium heat and add the cumin, chili powder, and oregano.
Stir constantly for 30-60 seconds until fragrant—you’ll smell the aroma wafting through your kitchen, and that’s when you know it’s ready. A non-stick skillet works too, but stainless steel conducts heat more evenly, preventing hot spots that could burn the spices.
For extra depth, I sometimes add a pinch of cayenne pepper to the toasted spices, but only if I’m feeling adventurous. The key is to keep the heat on medium—high heat can burn the spices before they release their full flavor.
Once toasted, transfer them immediately to the Dutch oven to preserve their aroma.
Broth Measurement Tools
Measuring broth accurately keeps your chili from being too thin or too thick, and I rely on a liquid measuring cup for precision.
For this recipe, 1 cup of broth is ideal, but if you’re using a low-sodium version, you might want to add an extra ½ teaspoon of salt to compensate. A measuring spoon comes in handy for adjusting seasoning later—start with small amounts and taste as you go. 💧
If you’re using homemade broth, strain it well to remove any solids that could make the chili grainy. For a richer flavor, I sometimes reserve ¼ cup of the pork cooking liquid at the end and stir it back in before serving.
It’s a small trick, but it adds a layer of depth that store-bought broth can’t match.
Nutrition facts
Frequently asked questions
Can I substitute canned green chiles for fresh?
Yes, but you'll need to adjust the quantity. Use 14 ounces canned green chiles (drained) instead of fresh, and add 1 teaspoon smoked paprika to mimic the smoky charred flavor. For extra depth, stir in 1 tablespoon adobo sauce from the can. The texture will be slightly different but still delicious!
How do I make this recipe less spicy?
Reduce the chili powder to 1 tablespoon instead of 2, and omit the cayenne if using. For extra mildness, stir in 1 cup sour cream or ½ cup tomato paste at the end to balance the heat. The cheese topping also helps mellow the flavors—just add a little more!
What's the best way to reheat leftovers?
Reheat gently on the stove over low heat with 1-2 tablespoons broth to restore moisture. For the cheese topping, add it fresh after reheating and broil for 2 minutes to melt perfectly. Microwaving works in a pinch, but it can make the cheese rubbery. Leftovers keep well for 5 days in the fridge.
Can I use ground pork instead of pork shoulder?
You can try it, but the texture will be very different—ground pork will make the chili thicker and more like stew. For best results, stick with pork shoulder, which stays tender during the long simmer. If you're set on ground pork, reduce the cooking time to 1 hour and add ½ cup extra broth to prevent drying out.
What are good sides to serve with this?
Classic pairings include warm corn tortillas, steamed white rice, and refried beans. For a heartier meal, add crusty bread or cornbread. A simple green salad with lime dressing cuts through the richness, while avocado slices add freshness. Don't forget sour cream or guacamole for topping!