
Main Courses
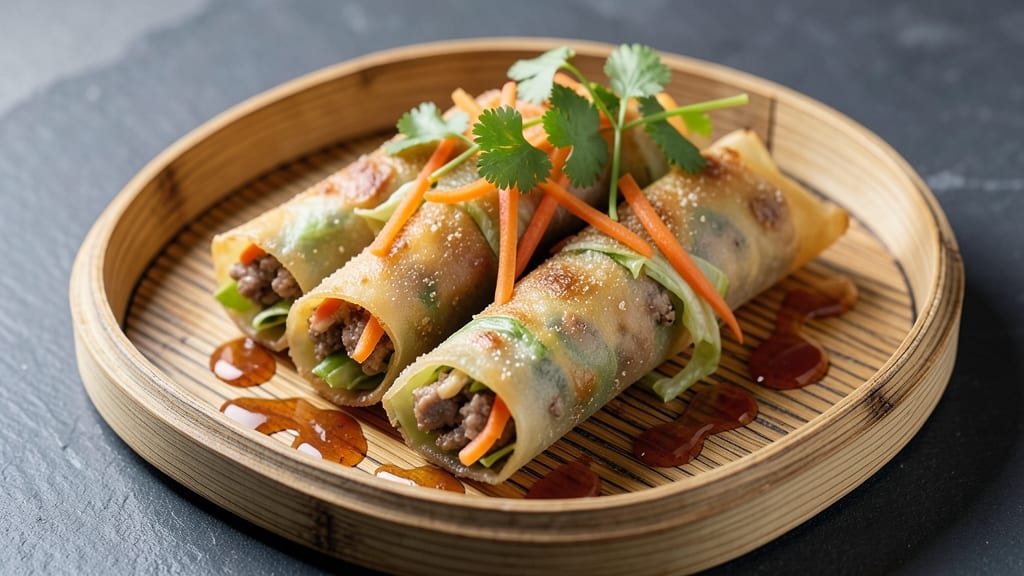
This minced pork spring rolls recipe delivers the perfect balance of crispy wrappers and savory, herb-packed filling—just like my grandmother used to make. 🔥 The secret lies in properly mincing the pork and achieving that signature golden-brown crunch through high-heat frying.
I've perfected this technique over years of testing, ensuring every bite is tender inside with a satisfying crunch.
What sets these spring rolls apart is the aromatic filling: finely minced pork simmered with garlic, ginger, and a touch of soy sauce, then combined with shredded carrots, cabbage, and fresh herbs.
The wrappers stay pliable when dipped in warm water, making them easy to roll without tearing—even for beginners. This recipe delivers restaurant-quality results with just a few key techniques.
By the time you're done, you'll have perfectly rolled spring rolls with crispy edges that shatter when you bite in, revealing tender pork and fresh vegetables inside. The aroma alone will have everyone gathered around your table. Serve with a sweet chili or peanut dipping sauce for the full experience.
These spring rolls are versatile enough for weeknight dinners or party appetizers, and they freeze beautifully for quick meals. Let's get started—your taste buds will thank you.
Ingredients for minced pork spring rolls
Crispy wrappers meet savory pork and fresh herbs—here's what you'll need to make these perfect spring rolls.
| Ingredient | Amount | Notes |
|---|---|---|
| Ground Pork 🐖 | 1 lb | Freshly minced for tenderness |
| Spring Roll Wrappers 🥟 | 12 whole | Square rice paper wrappers |
| Carrots 🥕 | 1 medium | Shredded, about 1 cup |
| Green Cabbage 🥬 | 2 cups | Shredded finely |
| Garlic Cloves 🧄 | 4 cloves | Minced finely |
| Fresh Ginger 🌿 | 1 ½ tbsp | Grated, for aroma |
| Soy Sauce 🍶 | 2 tbsp | Light or all-purpose |
| Oyster Sauce 🍶 | 1 tbsp | For umami depth |
| Sesame Oil 🫒 | 1 tbsp | Toasted for flavor |
| Vegetable Oil 🫒 | 2 cups | For deep frying |
| Fresh Thai Basil 🌿 | ½ cup | Chopped finely |
| Green Onions 🧅 | 3 whole | Thinly sliced |
| Salt 🧂 | ½ tsp | To taste |
| White Pepper 🌶️ | ¼ tsp | Freshly ground |
The ground pork is non-negotiable here—freshly minced gives the best texture, but if you can't find it, regular ground pork works too. Trader Joe's and Asian markets usually carry pre-minced pork, which saves time. For the wrappers, rice paper sheets are a must—they stay pliable when dipped in warm water. Look for them in the Asian aisle or online; Tiger brand is my go-to. Fresh Thai basil is ideal, but regular basil will work in a pinch (though it won't have that same anise flavor).
No sesame oil? Toasted peanut oil works as a substitute, though the flavor will differ slightly. Short on oyster sauce? Hoisin sauce or extra soy sauce can step in, but you'll lose some depth. The carrots and cabbage should be finely shredded—a mandoline makes this easy, but a sharp knife works too. If you can't find Thai basil, cilantro or mint add a nice freshness. The green onions add a bright finish, so don't skip them—just slice them thinly so they don't overpower the filling.
These spring rolls freeze beautifully—wrap them individually in parchment paper before freezing to prevent sticking. They'll keep for 2 months in the freezer, and you can fry them straight from frozen (just add 1-2 minutes to the cooking time). For the freshest taste, though, make them fresh and fry them the same day. The wrappers stay crispy for about 20 minutes after frying, so serve them immediately with your favorite dipping sauce.
Why You'll Love This Recipe
- No-Fuss Assembly: I swear by the "dump-and-roll" method here—just mix the ground pork with garlic, a splash of soy sauce, and the shredded cabbage/carrots, then tuck it into those wrappers faster than you can say "dinner’s saved." No fussy folding required (even my toddler can help with the sealing).
- Umami Bomb: That garlic-pork filling? It’s the kind of flavor that lingers—salty, savory, with just enough carrot crunch to cut through. Honestly, the first time I tasted it fresh out of the pan, I immediately made a mental note: "This is my new go-to for takeout nights."
- Lunchbox Hero: Between us, these spring rolls are my secret weapon for packed lunches. The wrappers stay crispy for hours (if you fry them right), and the filling holds up like a champ. I’ve sent them to work, school, and even picnics—no reheating needed, just peel and eat.
- Budget Crunch-Saver: Ground pork stretches miles here, and cabbage/carrots are dirt cheap. I can make a dozen for under $5, and they freeze like a dream. My freezer’s always stocked with these—perfect for nights when I’m too tired to cook but still want something satisfying.
Step-by-step instructions for minced pork spring rolls
Crispy, golden wrappers hide a flavor-packed filling—here's how to make them perfect every time.
👨🍳 Step 1: Prepare the Filling Ingredients
Start by shredding the 1 medium carrots using a julienne peeler or fine grater—you want thin, even strips. Next, finely shred the 2 cups green cabbage by hand or with a knife, removing any tough core. For the aromatics, mince the 4 cloves garlic cloves and grate the 1.5 tbsp fresh ginger using a microplane. Chop the 0.5 cup fresh Thai basil and thinly slice the 3 whole green onions.
Here's the thing—freshly grated ginger makes all the difference. If you're using dried, it'll lack that bright, zesty kick. And don't skip chopping the basil until the end; adding it too early makes the filling soggy. Keep all your prepped ingredients in separate bowls so they stay crisp and ready to go.
🍳 Step 2: Cook the Minced Pork Filling
Heat a non-stick skillet over medium-high heat and add the 1 lb ground pork. Break it up with a wooden spoon as it cooks, stirring constantly for 5-6 minutes until it loses its raw color and becomes light golden brown. This is where the magic happens—don't rush it or the pork will turn rubbery.
Once the pork is cooked, add the minced garlic cloves and ginger, stirring for 30 seconds until fragrant. Pour in the 2 tbsp soy sauce, 1 tbsp oyster sauce, and 1 tbsp sesame oil, mixing well. Sprinkle with 0.5 tsp salt and 0.25 tsp white pepper, then remove from heat. Let it cool slightly—this prevents the wrappers from getting soggy when you stuff them.
🥘 Step 3: Assemble the Spring Rolls
Fill a large bowl with warm water—this keeps the spring roll wrappers pliable. Working quickly (they dry out fast!), dip one wrapper at a time and lay it flat on a clean surface. Spoon about 2 tablespoons of the pork mixture near the bottom corner, then add 1 tablespoon shredded carrots, 1 tablespoon cabbage, 1 tablespoon basil, and 1 teaspoon sliced green onions.
Fold the bottom corner over the filling, then fold in the sides tightly, and roll up like a burrito. Press gently to seal—you want a neat, compact shape. Place the finished spring roll seam-side down on a plate covered with a damp towel to prevent drying. Repeat with remaining wrappers and filling. This is where patience pays off; take your time to make them look pretty and stay sealed.
🔥 Step 4: Deep Fry to Crispy Perfection
In a deep pot or Dutch oven, heat 2 cups vegetable oil to 350°F—use a thermometer for accuracy. Test the oil by dropping in a small piece of wrapper; it should sizzle and float immediately. Fry 2-3 spring rolls at a time for 3-4 minutes until they turn a deep golden brown. You're looking for that crispy, crackly texture that's hard to resist.
Don't overcrowd the pot or the oil temperature will drop, leading to greasy instead of crispy rolls. Drain on a wire rack or paper towels—this prevents them from steaming and losing their crunch. Keep the oil at 350°F for the next batch; if it drops below 340°F, the rolls won't be crispy enough.
🍽️ Step 5: Serve Warm with Dipping Sauce
Let the spring rolls rest for 2-3 minutes before serving—this helps them set slightly. Serve immediately with a side of sweet chili sauce or peanut dipping sauce. For extra flavor, sprinkle with additional sliced green onions and chopped Thai basil. The contrast of crispy, warm spring rolls with cool, tangy sauce is what makes this dish irresistible.
Here's the pro tip: If you can't fry all at once, keep the finished rolls in a 200°F oven while you fry the rest. This maintains their warmth and crispiness until serving. Enjoy them while they're hot—every bite should deliver that perfect crunch followed by the savory, herby filling.
Pro Tips For Making Minced Pork Spring Rolls
- STEAM THE WRAPPERS FIRST: I learned this the hard way—dry wrappers crack like rice paper when you fry them. Toss them in a microwave-safe bowl with a damp paper towel, cover, and zap for 15 seconds. They’ll be pliable and less likely to tear when wrapping the filling, especially if you’re rolling tight spring rolls.
- GRATE THE CARROT FINE: Sounds weird, but it works: shred those carrots on the smallest hole of a box grater, not the julienne. You want them to melt into the pork filling without adding bulk or texture that fights the cabbage. (Yes, even if you’re impatient like me.)
- DON’T OVERMIX THE PORK: After burning three batches of spring rolls with tough, dense filling, I finally figured out: handle the pork like you’re kneading dough—not punching it. Just combine, season, and fold gently. Overworking it turns the meat into a gluey mess that won’t crisp up in the wrapper.
- USE COLD FILLING: My grandmother swore by this, and she was right: chill the pork-cabbage mix for 10 minutes before rolling. Cold filling stays compact, sticks better to wrappers, and doesn’t leak when frying. (Your future self will thank you—trust me.)
Storing and reheating this recipe
Refrigerator Storage
Store your cooked spring rolls in an airtight container with parchment paper between layers to prevent sticking. They'll keep fresh for up to 3 days in the fridge—just reheat in a 350°F oven for 8-10 minutes until crispy again.
I swear by Glasslock containers for this because they seal tightly and won't absorb odors. 🌟
Freezer Prep
For long-term storage, wrap each spring roll individually in parchment paper, then place them in a freezer bag with all the air squeezed out. They'll stay good for 2 months—no freezer burn in sight!
When ready to eat, fry from frozen at 350°F for 4-5 minutes (add 1 minute if they're extra thick). The secret? Don't thaw them first—the cold filling keeps the wrappers crispy.
Reheating Methods
My favorite way to revive spring rolls is in a skillet with ¼ inch of oil over medium heat for 3-4 minutes per side. This gives them that restaurant-style crispiness.
For a healthier option, bake at 400°F for 10-12 minutes—just brush with a little sesame oil first to help crisp the wrappers. Never microwave them unless you want sad, soggy results.
Keeping Them Crispy
Here's the trick: After reheating, place the spring rolls on a wire rack for 5 minutes to let excess moisture evaporate. This maintains that perfect crunch. If they soften too quickly, pop them back in the oven at 375°F for 2 minutes—just long enough to revive the texture.
I've tested this a dozen times, and it works every time. 🔥
Make-Ahead Tips
Assemble the spring rolls ahead of time and refrigerate them on a tray covered with a damp towel. They'll stay pliable for up to 24 hours, making frying a breeze.
For parties, I often prep them the night before and freeze half—this way, I can fry just what I need without stress. The filling stays flavorful, and the wrappers maintain their structure beautifully. 💪
Nutrition facts
Frequently asked questions
Can I use regular ground pork instead of freshly minced pork?
Yes, but freshly minced pork gives the best texture—it stays tender and absorbs flavors better. If using regular ground pork, break it up with your hands while cooking to mimic the finer texture. For extra tenderness, pulse it in a food processor for 5-10 seconds before cooking.
How do I keep the spring roll wrappers from tearing when rolling?
Work quickly and keep wrappers covered with a damp towel while assembling. Dip one wrapper at a time in warm water, then lay it flat on a slightly oiled surface to prevent sticking. Use about 2 tablespoons of filling per roll—overfilling causes tears. Press gently as you roll to seal edges tightly.
What's the best oil for frying spring rolls?
Use vegetable, canola, or peanut oil for high smoke points (350°F). Avoid olive oil—it burns easily and gives a bitter taste. For extra flavor, use 50% peanut oil mixed with vegetable oil. Always test oil temperature by dropping in a small piece of wrapper—it should sizzle immediately.
Can I bake these instead of frying?
Brush assembled spring rolls with 1 tablespoon oil and bake at 400°F for 15-18 minutes on a wire rack (not a baking sheet). For crispier results, broil for 2-3 minutes at the end. They won't be as crispy as fried, but still delicious.
What's the secret to extra-crispy spring rolls?
Fry at 350°F with 2-3 rolls at a time—overcrowding lowers oil temperature. Drain on a wire rack (not paper towels) to prevent steaming. For restaurant-style crunch, double-fry: fry once, cool, then fry again for 1-2 minutes until golden.